萬盛學電腦網 >> 網頁制作 >> Html5 >> 在支持HTML5的浏覽器上運行WebGL程序的方法
在支持HTML5的浏覽器上運行WebGL程序的方法
前提條件和預期結果
目前只有少數的浏覽器支持 WebGL ,請看我的另外一篇文章:Can I use WebGL?.
下面的例子是在 Windows 下的 Chrome 16/23 以及 Android 下的 Firefox 17 進行測試。如果你使用的是非兼容浏覽器訪問則會彈出一個警告。

圖1:包含 Hello world 文本的動畫的 WebGL 立方體
在兼容 HTML5 的浏覽器上,你將會看到如下圖所示的帶動畫效果的立方體:
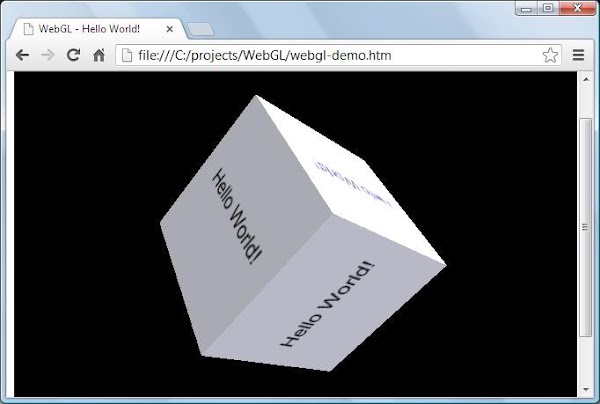
圖2: 示例運行的屏幕截圖
該代碼基於 Lighting in WebGL - How to simulate lighting effects in your WebGL context - 非常感謝這篇教程。在該實例初始運行時,動畫的立方體是通過一個靜態的 Bitmap 圖形對象渲染的。
下面的代碼演示如何在程序中動態的渲染文本:
XML/HTML Code復制內容到剪貼板
// TODO #1 New method to create a texture
function createCubeTexture(text) {
...
}
在這裡使用 gl.pixelStorei(gl.UNPACK_FLIP_Y_WEBGL, true); 是非常重要的,用來確保寫文本時不會前後顛倒。剩下的就很容易理解了:
XML/HTML Code復制內容到剪貼板
// TODO #2 Assign the created texture for display
cubeTexture = createCubeTexture("Hello World!");
源碼
// File #1: webgl-demo.htm
XML/HTML Code復制內容到剪貼板- <html>
- <head>
- <title>WebGL - Hello World!</title>
- <meta http-equiv="Content-Type" content="text/html; charset=utf-8">
- <script src="sylvester.js" type="text/javascript"></script>
- <script src="glUtils.js" type="text/javascript"></script>
- <script src="webgl-demo.js" type="text/javascript"></script>
- <!-- Fragment shader program -->
- <script id="shader-fs" type="x-shader/x-fragment">
- varying highp vec2 vTextureCoord;
- varying highp vec3 vLighting;
- uniform sampler2D uSampler;
- void main(void) {
- highp vec4 texelColor = texture2D(uSampler, vec2(vTextureCoord.s, vTextureCoord.t));
- gl_FragColor = vec4(texelColor.rgb * vLighting, texelColor.a);
- }
- </script>
- <!-- Vertex shader program -->
- <script id="shader-vs" type="x-shader/x-vertex">
- attribute highp vec3 aVertexNormal;
- attribute highp vec3 aVertexPosition;
- attribute highp vec2 aTextureCoord;
- uniform highp mat4 uNormalMatrix;
- uniform highp mat4 uMVMatrix;
- uniform highp mat4 uPMatrix;
- varying highp vec2 vTextureCoord;
- varying highp vec3 vLighting;
- void main(void) {
- gl_Position = uPMatrix * uMVMatrix * vec4(aVertexPosition, 1.0);
- vTextureCoord = aTextureCoord;
- // Apply lighting effect
- highp vec3 ambientLight = vec3(0.6, 0.6, 0.6);
- highp vec3 directionalLightColor = vec3(0.5, 0.5, 0.75);
- highp vec3 directionalVector = vec3(0.85, 0.8, 0.75);
- highp vec4 transformedNormal = uNormalMatrix * vec4(aVertexNormal, 1.0);
- highp float directional = max(dot(transformedNormal.xyz, directionalVector), 0.0);
- vLighting = ambientLight + (directionalLightColor * directional);
- }
- </script>
- </head>
- <body onload="start()">
- <canvas id="glcanvas" width="640" height="480">
- Your browser doesn't appear to support the HTML5 <code><canvas></code> element.
- </canvas>
- </body>
- </html>
// File #02: webgl-demo.js
XML/HTML Code復制內容到剪貼板
var canvas;
var gl;
var cubeVerticesBuffer;
var cubeVerticesTextureCoordBuffer;
var cubeVerticesIndexBuffer;
var cubeVerticesIndexBuffer;
var cubeRotation = 0.0;
var lastCubeUpdateTime = 0;
var cubeImage;
var cubeTexture;
var mvMatrix;
var shaderProgram;
var vertexPositionAttribute;
var vertexNormalAttribute;
var textureCoordAttribute;
var perspectiveMatrix;
//
// start
//
// Called when the canvas is created to get the ball rolling.
//
function start() {
canvas = document.getElementById("glcanvas");
initWebGL(canvas); // Initialize the GL context
// Only continue if WebGL is available and working
if (gl) {
gl.clearColor(0.0, 0.0, 0.0, 1.0); // Clear to black, fully opaque
gl.clearDepth(1.0); // Clear everything
gl.enable(gl.DEPTH_TEST); // Enable depth testing
gl.depthFunc(gl.LEQUAL); // Near things obscure far things
// Initialize the shaders; this is where all the lighting for the
// vertices and so forth is established.
initShaders();
// Here's where we call the routine that builds all the objects
// we'll be drawing.
initBuffers();
// Next, load and set up the textures we'll be using.
// TODO#2 Start
cubeTexture = createCubeTexture("Hello World!");
// TODO#2 End
// Set up to draw the scene periodically.
setInterval(drawScene, 15);
}
}
//
// initWebGL
//
// Initialize WebGL, returning the GL context or null if
// WebGL isn't available or could not be initialized.
//
function initWebGL() {
gl = null;
try {
gl = canvas.getContext("experimental-webgl");
}
catch(e) {
}
// If we don't have a GL context, give up now
if (!gl) {
alert("Unable to initialize WebGL. Your browser may not support it.");
}
}
//
// initBuffers
//
// Initialize the buffers we'll need. For this demo, we just have
// one object -- a simple two-dimensional cube.
//
function initBuffers() {
// Create a buffer for the cube's vertices.
cubeVerticesBuffer = gl.createBuffer();
// Select the cubeVerticesBuffer as the one to apply vertex
// operations to from here out.
gl.bindBuffer(gl.ARRAY_BUFFER, cubeVerticesBuffer);
// Now create an array of vertices for the cube.
var vertices = [
// Front face
-1.0, -1.0, 1.0,
1.0, -1.0, 1.0,
1.0, 1.0, 1.0,
-1.0, 1.0, 1.0,
// Back face
-1.0, -1.0, -1.0,
-1.0, 1.0, -1.0,
1.0, 1.0, -1.0,
1.0, -1.0, -1.0,
// Top face


