您现在的位置: 萬盛學電腦網 >> 程式設計 > >> 伺服器教學
Nagios 核心安裝與分散式監控實戰:NRPE 監控 Linux、NSClient++ 監控 Windows、郵件告警完整部署
前言
Nagios 是業界標準的開源基礎設施監控系統,透過插件架構實現對主機資源 (CPU、磁碟、日誌)、網路服務 (HTTP、SMTP、SSH)、網路設備 (交換器、路由器) 的全方位監控。本文記錄在 CentOS 環境下,從 Nagios 3.4.3 核心編譯、Apache+PHP Web 介面部署、物件配置模組化設計,到利用 NRPE 監控遠端 Linux「本地資源」、NSClient++ 監控 Windows、以及 Sendmail 郵件告警的完整落地流程。
一、架構規劃與實驗環境
| 角色 | Hostname | OS | IP | 軟體元件 |
|---|---|---|---|---|
| 監控主機 | Nagios-Server | CentOS 6.3 | 192.168.1.108 | Apache、PHP、Nagios Core、nagios-plugins |
| 被監控 Linux | Nagios-Linux | CentOS 5.8 | 192.168.1.111 | nagios-plugins、NRPE |
| 被監控 Windows | Nagios-Windows | Windows XP | 192.168.1.113 | NSClient++ |
前置條件:防火牆關閉 / iptables stopped、SELINUX=disabled。
二、Nagios Server 核心安裝
1. 基礎相依套件
yum install -y gcc glibc glibc-common gd gd-devel xinetd openssl-devel2. 建立帳號與目錄
useradd -s /sbin/nologin nagios
mkdir /usr/local/nagios
chown -R nagios.nagios /usr/local/nagios
3. 編譯安裝 Nagios Core
wget https://prdownloads.sourceforge.net/sourceforge/nagios/nagios-3.4.3.tar.gz
tar zxvf nagios-3.4.3.tar.gz
cd nagios
./configure --prefix=/usr/local/nagios
make all
make install
make install-init        # 安裝 /etc/init.d/nagios
make install-commandmode # 設定外部命令目錄權限
make install-config      # 安裝範例配置檔
chkconfig --add nagios
chkconfig --level 35 nagios on
4. 驗證目錄結構
ls /usr/local/nagios/
# bin/  etc/  libexec/  sbin/  share/  var/  (五大核心目錄齊全即正確)
5. 安裝 Nagios Plugins (核心檢查命令庫)
wget https://prdownloads.sourceforge.net/sourceforge/nagiosplug/nagios-plugins-1.4.16.tar.gz
tar zxvf nagios-plugins-1.4.16.tar.gz
cd nagios-plugins-1.4.16
./configure --prefix=/usr/local/nagios
make && make install
6. 安裝 Apache 2.2 + PHP 5.4 (Web 介面必備)
# Apache
wget https://archive.apache.org/dist/httpd/httpd-2.2.23.tar.gz
tar zxvf httpd-2.2.23.tar.gz
cd httpd-2.2.23
./configure --prefix=/usr/local/apache2 --with-included-apr
make && make install

# PHP
wget https://cn2.php.net/distributions/php-5.4.10.tar.gz
tar zxvf php-5.4.10.tar.gz
cd php-5.4.10
./configure --prefix=/usr/local/php --with-apxs2=/usr/local/apache2/bin/apxs
make && make install
7. Apache 整合 Nagios Web 介面
編輯 /usr/local/apache2/conf/httpd.conf:
# 執行身份改為 nagios
User nagios
Group nagios

# 支援 index.php

    DirectoryIndex index.html index.php

AddType application/x-httpd-php .php

# Nagios CGI 與靜態資源別名與認證
ScriptAlias /nagios/cgi-bin "/usr/local/nagios/sbin"

    AuthType Basic
    Options ExecCGI
    AllowOverride None
    Order allow,deny
    Allow from all
    AuthName "Nagios Access"
    AuthUserFile /usr/local/nagios/etc/htpasswd
    Require valid-user


Alias /nagios "/usr/local/nagios/share"

    AuthType Basic
    Options None
    AllowOverride None
    Order allow,deny
    Allow from all
    AuthName "Nagios Access"
    AuthUserFile /usr/local/nagios/etc/htpasswd
    Require valid-user
8. 建立 Web 認證帳號
/usr/local/apache2/bin/htpasswd -c /usr/local/nagios/etc/htpasswd david
# 輸入密碼兩次
9. 啟動 Apache
/usr/local/apache2/bin/apachectl start瀏覽 https://192.168.1.108/nagios/ 輸入帳密即可進入 Web 介面。
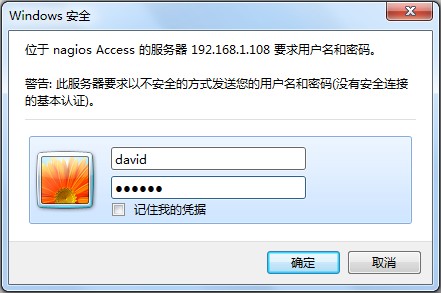
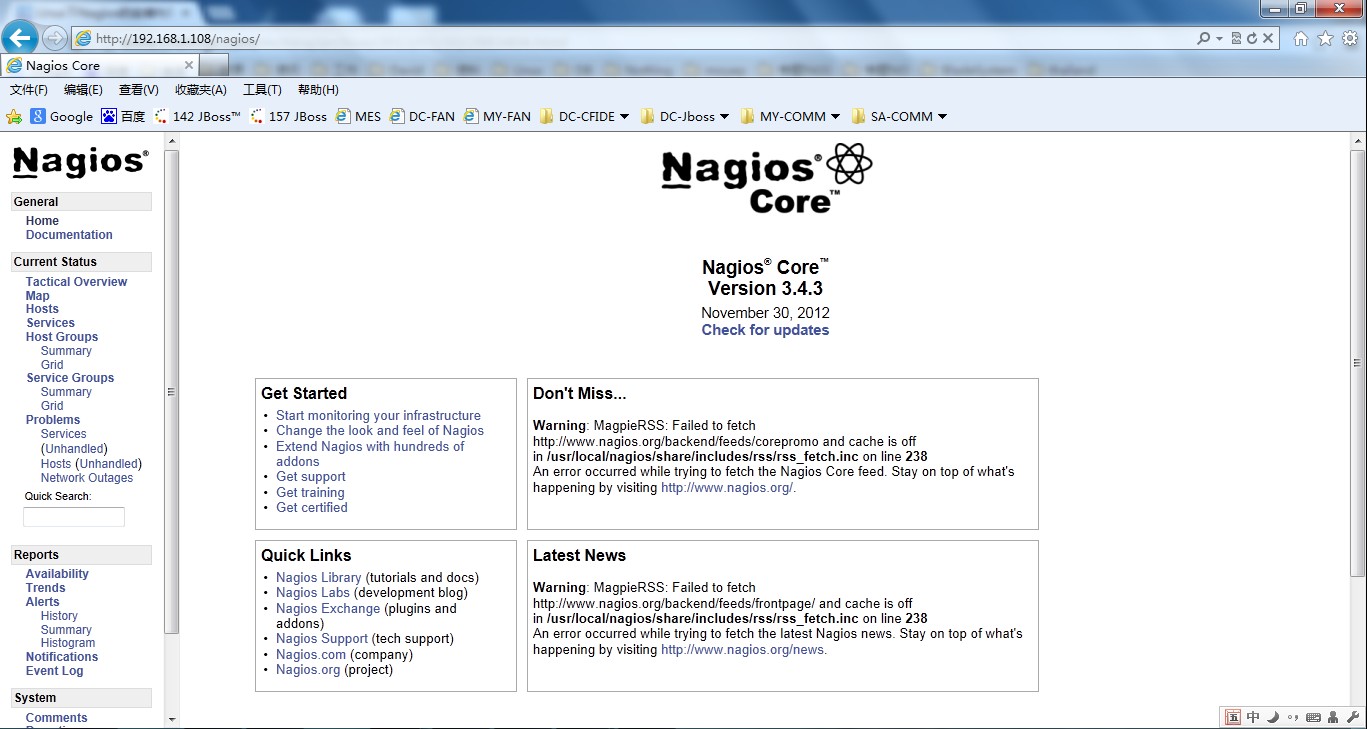
三、模組化配置設計 (易維護、易擴充)
Nagios 物件定義 (主機、服務、聯絡人、命令、時間段、模板) 互相引用,建議拆分為獨立檔案並在 nagios.cfg 中 cfg_file= 引入。
核心配置檔對照表
| 檔案 | 用途 | 備註 |
|---|---|---|
| nagios.cfg | 主配置,引用所有物件檔 | 核心入口 |
| resource.cfg | 變數定義 ($USER1$=/usr/local/nagios/libexec) | 插件路徑集中管理 |
| templates.cfg | 主機/服務/聯絡人模板 (register=0) | 定義通用屬性供繼承 |
| commands.cfg | 檢查/通知命令定義 | 引用 $USER1$ 變數 |
| hosts.cfg | 主機/主機群組定義 (自建) | Linux/Windows 主機 |
| services.cfg | 服務定義 (自建) | 綁定主機、命令、模板 |
| contacts.cfg | 聯絡人/聯絡人群組 | 郵件/簡訊接收者 |
| timeperiods.cfg | 監控/通知時間段 | 24x7、workhours 等 |
| localhost.cfg | 本機 (Server) 監控定義 | 預設檔修改即可 |
| windows.cfg | Windows 主機監控定義 | 預設檔修改啟用 |
| cgi.cfg | CGI 權限控制 | 授權 david 執行命令 |
關鍵配置片段
templates.cfg 關鍵模板 (點擊展開)
define contact{
    name generic-contact
    service_notification_period 24x7
    host_notification_period 24x7
    service_notification_options w,u,c,r
    host_notification_options d,u,r
    service_notification_commands notify-service-by-email
    host_notification_commands notify-host-by-email
    register 0
}

define host{
    name generic-host
    notifications_enabled 1
    check_period 24x7
    max_check_attempts 10
    check_command check-host-alive
    notification_period 24x7
    notification_interval 10
    notification_options d,u,r
    contact_groups ts
    register 0
}

define host{
    name linux-server
    use generic-host
    check_interval 5
    retry_interval 1
    register 0
}

define host{
    name windows-server
    use generic-host
    check_interval 5
    retry_interval 1
    register 0
}

define service{
    name generic-service
    active_checks_enabled 1
    check_period 24x7
    max_check_attempts 3
    normal_check_interval 5
    retry_check_interval 2
    contact_groups ts
    notification_options w,u,c,r
    notification_interval 10
    notification_period 24x7
    register 0
}

define service{
    name local-service
    use generic-service
    max_check_attempts 4
    normal_check_interval 5
    retry_check_interval 1
    register 0
}
commands.cfg 關鍵命令定義 (點擊展開)
define command{
    command_name notify-host-by-email
    command_line /usr/bin/printf "%b" "***** Nagios *****\n\nNotification Type: $NOTIFICATIONTYPE$\nHost: $HOSTNAME$\nState: $HOSTSTATE$\nAddress: $HOSTADDRESS$\nInfo: $HOSTOUTPUT$\n\nDate/Time: $LONGDATETIME$\n" | /bin/mail -s "** $NOTIFICATIONTYPE$ Host Alert: $HOSTNAME$ is $HOSTSTATE$ **" $CONTACTEMAIL$
}
define command{
    command_name notify-service-by-email
    command_line /usr/bin/printf "%b" "***** Nagios *****\n\nNotification Type: $NOTIFICATIONTYPE$\n\nService: $SERVICEDESC$\nHost: $HOSTALIAS$\nAddress: $HOSTADDRESS$\nState: $SERVICESTATE$\n\nDate/Time: $LONGDATETIME$\n\nAdditional Info:\n\n$SERVICEOUTPUT$\n" | /bin/mail -s "** $NOTIFICATIONTYPE$ Service Alert: $HOSTALIAS$/$SERVICEDESC$ is $SERVICESTATE$ **" $CONTACTEMAIL$
}
define command{
    command_name check-host-alive
    command_line $USER1$/check_ping -H $HOSTADDRESS$ -w 3000.0,80% -c 5000.0,100% -p 5
}
define command{
    command_name check_nrpe
    command_line $USER1$/check_nrpe -H $HOSTADDRESS$ -c $ARG1$
}
define command{
    command_name check_nt
    command_line $USER1$/check_nt -H $HOSTADDRESS$ -p 12489 -s 123456 -v $ARG1$ $ARG2$
}
# 其他 check_local_disk, check_http, check_ssh 等略
hosts.cfg / services.cfg / contacts.cfg 範例 (點擊展開)
# hosts.cfg
define host{
    use linux-server
    host_name Nagios-Linux
    alias Nagios-Linux
    address 192.168.1.111
}
define hostgroup{
    hostgroup_name bsmart-servers
    alias bsmart servers
    members Nagios-Linux
}

# services.cfg (僅針對 Nagios-Linux 定義 NRPE 服務)
define service{
    use local-service
    host_name Nagios-Linux
    service_description Current Load
    check_command check_nrpe!check_load
}
define service{
    use local-service
    host_name Nagios-Linux
    service_description Check Disk sda1
    check_command check_nrpe!check_sda1
}
# ... Total Processes, Current Users, Check Zombie Procs, Check Swap, HTTP 同理

# contacts.cfg
define contact{
    contact_name David
    use generic-contact
    alias Nagios Admin
    email david.tang@bsmart.cn
}
define contactgroup{
    contactgroup_name ts
    alias Technical Support
    members David
}

# timeperiods.cfg
define timeperiod{
    timeperiod_name 24x7
    alias 24 Hours A Day, 7 Days A Week
    sunday 00:00-24:00
    monday 00:00-24:00
    ...
    saturday 00:00-24:00
}
define timeperiod{
    timeperiod_name workhours
    alias Normal Work Hours
    monday 09:00-17:00
    tuesday 09:00-17:00
    ...
    friday 09:00-17:00
}
驗證配置並啟動
/usr/local/nagios/bin/nagios -v /usr/local/nagios/etc/nagios.cfg
# 輸出 "Things look okay - No serious problems" 即通過
service nagios start
service httpd restart  # 或 apachectl restart
四、NRPE 實現遠端 Linux 本地資源監控
原理架構

流程:Nagios Server 執行 check_nrpe → SSL 連線遠端 NRPE Daemon (port 5666) → 遠端執行本地插件 (check_disk, check_load 等) → 結果回傳 → Nagios 處理顯示。
被監控端 (Nagios-Linux) 部署
# 1. 建立帳號
useradd nagios
passwd nagios

# 2. 安裝 nagios-plugins (同 Server 版本)
tar zxvf nagios-plugins-1.4.16.tar.gz
cd nagios-plugins-1.4.16
./configure --prefix=/usr/local/nagios
make && make install
chown -R nagios.nagios /usr/local/nagios

# 3. 安裝 NRPE
wget https://prdownloads.sourceforge.net/sourceforge/nagios/nrpe-2.13.tar.gz
tar zxvf nrpe-2.13.tar.gz
cd nrpe-2.13
./configure
make all
make install-plugin      # 安裝 check_nrpe (測試用)
make install-daemon      # 安裝 nrpe daemon
make install-daemon-config # 安裝 /usr/local/nagios/etc/nrpe.cfg
make install-xinetd      # 安裝 /etc/xinetd.d/nrpe

# 4. 設定 xinetd 允許監控主機 IP
vi /etc/xinetd.d/nrpe
# only_from = 127.0.0.1 192.168.1.108

# 5. 註冊服務 port
echo "nrpe 5666/tcp" >> /etc/services

# 6. 啟動 xinetd
service xinetd restart
netstat -an | grep 5666  # 確認 LISTEN

# 7. 本地測試
/usr/local/nagios/libexec/check_nrpe -H localhost
# 應回傳 NRPE v2.13
監控端 (Nagios-Server) 設定
# 1. 僅安裝 check_nrpe 插件
cd nrpe-2.13
./configure
make all
make install-plugin

# 2. 測試連線
/usr/local/nagios/libexec/check_nrpe -H 192.168.1.111
# 回傳版本號即通

# 3. commands.cfg 增加 check_nrpe 定義 (見上)

# 4. services.cfg 定義監控項 (見上)

# 5. 遠端 nrpe.cfg 自訂命令 (如需監控 swap、http)
# 在 Nagios-Linux 上編輯 /usr/local/nagios/etc/nrpe.cfg 新增:
command[check_swap]=/usr/local/nagios/libexec/check_swap -w 20% -c 10%
command[check_http]=/usr/local/nagios/libexec/check_http -I 127.0.0.1
# xinetd 模式無需重啟 nrpe 即時生效

# 6. 重啟 Nagios 服務
service nagios restart
驗證成果
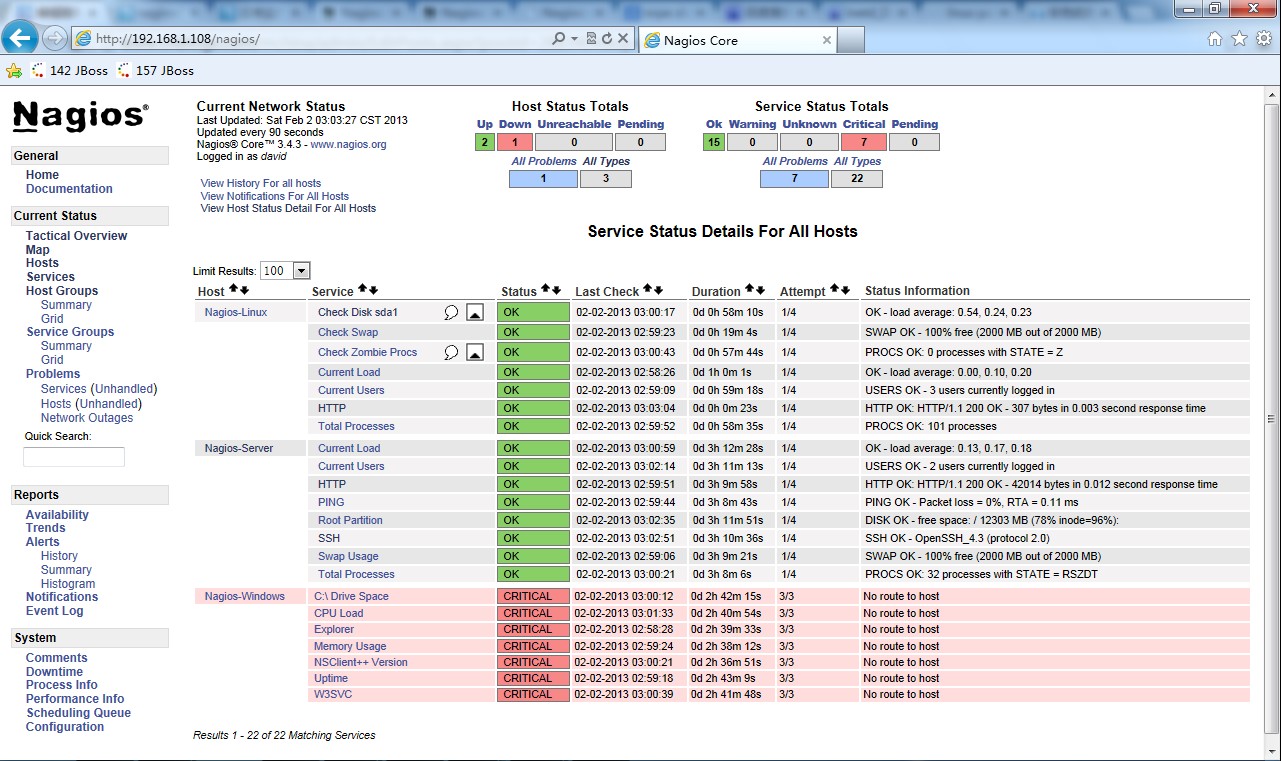
Nagios-Linux 所有本地資源 (Load、Disk、Process、Users、Swap、HTTP) 監控項均呈現 OK 狀態。
五、NSClient++ 實現 Windows 本地資源監控
架構差異

NRPE:被控端需安裝插件,NRPE 只負責調度。
NSClient++:被控端單一代理程式內建所有檢查邏輯,無額外插件,功能固定但涵蓋 CPU、Memory、Disk、Service、Process 等常見需求。
Windows 端安裝步驟
- 下載
NSClient++-0.2.7.zip解壓至C:\NSClient++-0.2.7 - 管理員 CMD 執行:
nsclient++ /install→nsclient++ SysTray - 服務管理器 (
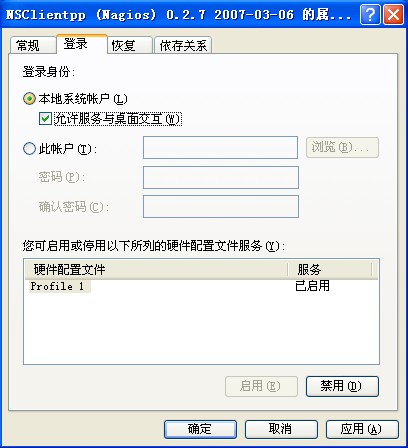
services.msc) 找到NSClientpp→ 登入頁勾選「允許服務與桌面互動」 - 編輯
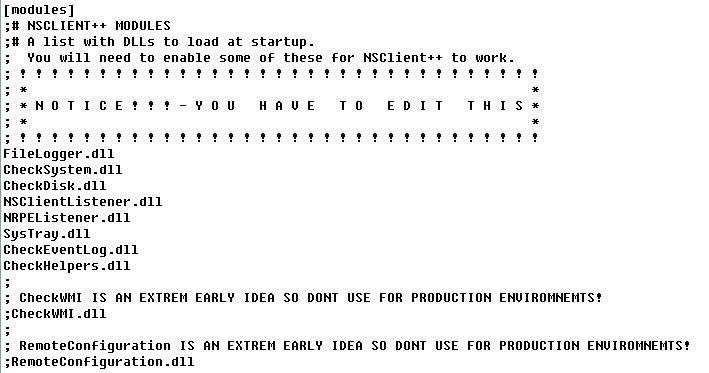
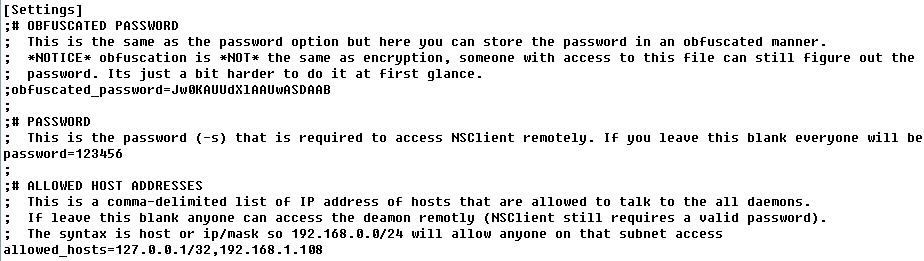
C:\NSClient++-0.2.7\NSC.ini:[modules]區段:取消註解所有模組 (除 CheckWMI.dll、RemoteConfiguration.dll)[Settings]:password=123456、allowed_hosts=192.168.1.108(或 192.168.1.0/24)[NSClient]:確認port=12489未被註解
nsclient++ /start啟動,系統匣出現黃色 M 圖示- Windows 防火牆開放 TCP 12489







Server 端調整 check_nt 命令加入密碼
# commands.cfg 修改
define command{
    command_name check_nt
    command_line $USER1$/check_nt -H $HOSTADDRESS$ -p 12489 -s 123456 -v $ARG1$ $ARG2$
}
中文系統 PDH 計數器錯誤修正
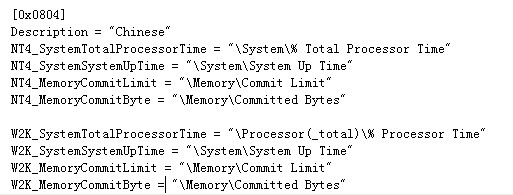
錯誤:NSClient - ERROR: PDH Collection thread not running、日誌 You need to manually configure performance counters!
- 編輯
C:\NSClient++-0.2.7\counters.defs - 複製
English US區塊到檔案末尾,修改Description = "Chinese" - 重啟 NSClient++ 服務

驗證成果

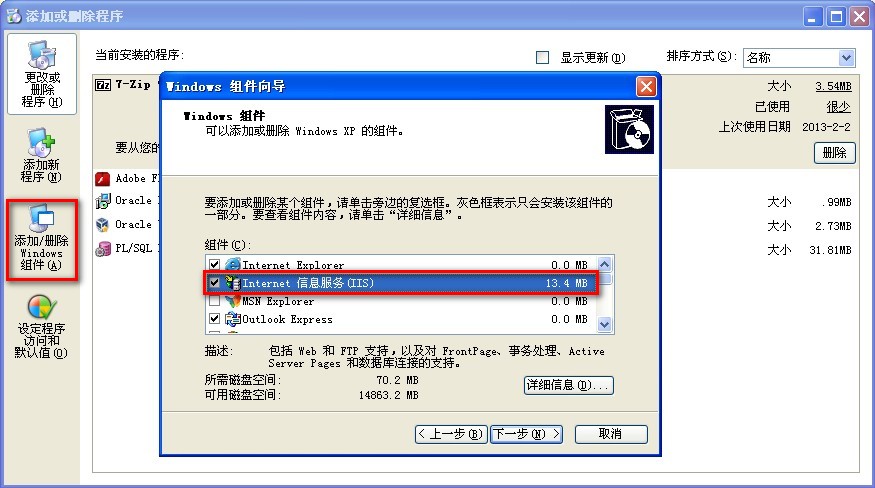
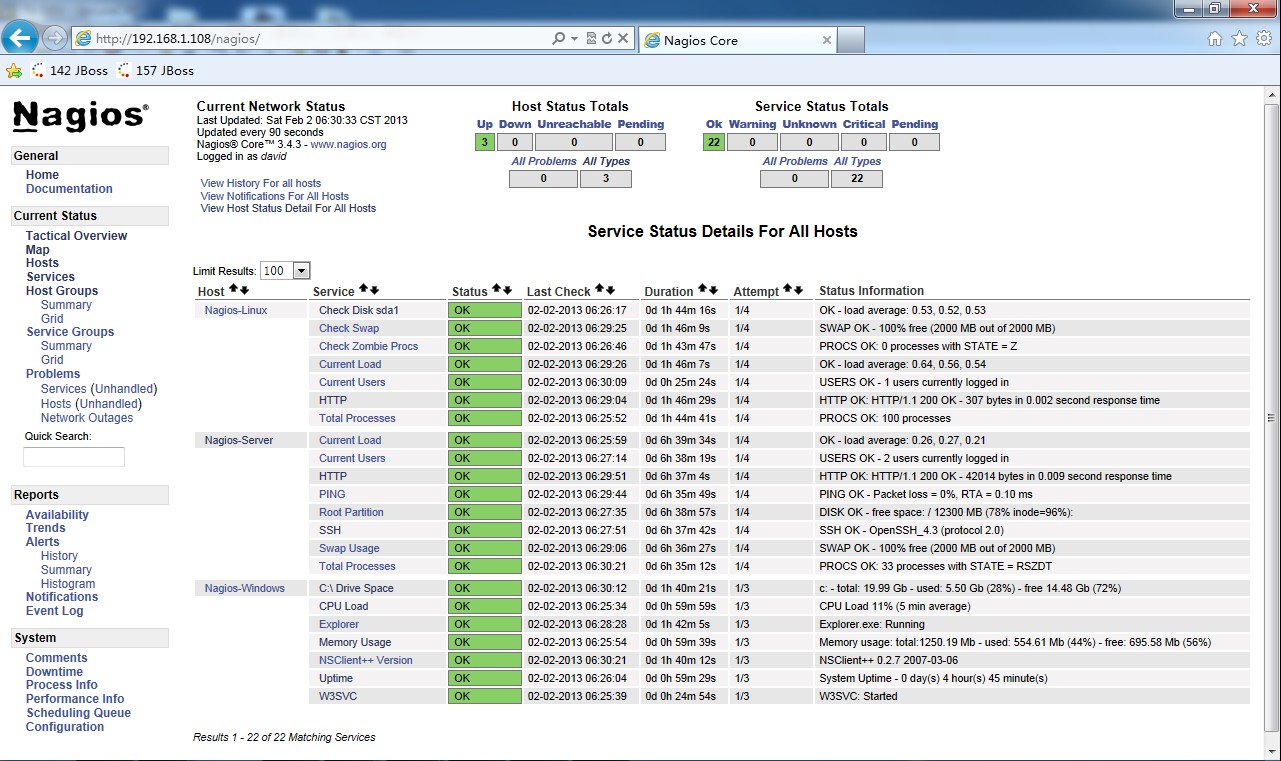
安裝 IIS 後 W3SVC 服務亦轉為 OK,Windows 主機監控全面生效。
六、郵件告警配置
# 1. 安裝 sendmail
yum install -y sendmail*
service sendmail restart

# 2. 測試寄信
echo "Hello World" | mail david.tang@bsmart.cn

# 3. contacts.cfg 已定義 contact David 指向此信箱
# 4. templates.cfg generic-contact 定義 service_notification_commands notify-service-by-email
#    commands.cfg 已定義 notify-service-by-email 呼叫 /bin/mail

# 告警郵件範例 (PROBLEM / RECOVERY)
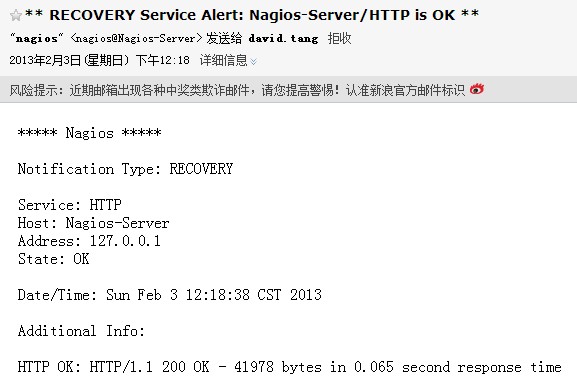
# 見原文截圖:主機/服務名稱、狀態、IP、時間、輸出資訊完整呈現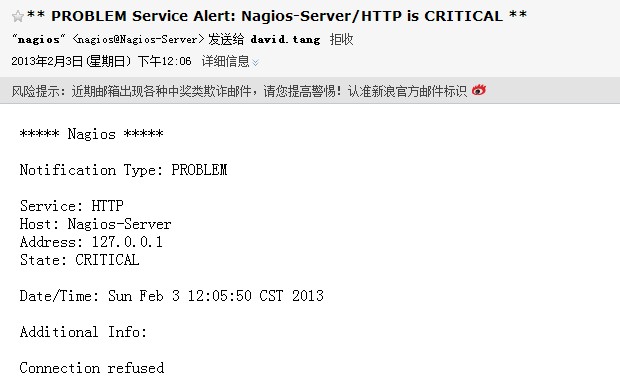
七、常見錯誤與補充修正
- 配置檔註解符號:Nagios 配置檔只支援分號
;當行註解,不可使用#。文中範例若出現#註解請自行改為;,否則驗證會報錯。 check_command check_ping!100.0,20%!500.0,60%中!為參數分隔符,對應$ARG1$、$ARG2$。- Web 介面操作 (重啟/停止 Nagios) 需在
cgi.cfg授權authorized_for_system_commands=david。 interval_length=60定義時間單位為 60 秒 (1 分鐘),所有 interval 參數單位均為分鐘。
總結
本文建立了一套完整的 Nagios 監控體系:
- 核心編譯安裝 + Apache+PHP Web 介面 + 模組化配置管理
- NRPE 解決 Linux 遠端本地資源監控 (CPU、Disk、Process、Swap、HTTP...)
- NSClient++ 解決 Windows 遠端本地資源監控 (CPU、Memory、Disk、Service、Process...)
- Sendmail 實現郵件告警通知閉環
此架構具備高擴充性,新增被監控主機僅需部署 Agent (NRPE/NSClient++) 並在 Server 端增減 hosts.cfg/services.cfg 即可,極適合中小型企業基礎設施統一監控需求。
推薦文章
- DOS 基礎指令完整速查:從入門到實用
- Nginx 整合 ngx_upload_module 實現大檔案上傳與進度控制
- Windows Server 2008 被忽視的 9 大關鍵特性:從列印管理到網…
- Windows 7 執行命令大全:71 個指令與功能速查表
- Linux 備份與恢復技術全解析:工具、策略與實務
- Windows XP 進入桌面假死機?五招精準解決啟動卡頓 (修正版)
- Linux rsync + SSH 實現遠程異步備份與定時同步完整教程
- ADSafe 淨化大師無法攔截廣告?兩大原因與解決步驟圖解
- SQL Server 2008 圖文安裝配置完整教學
- Windows XP 進入桌面卡頓 1 分鐘?五招精準解決啟動延遲