萬盛學電腦網 >> 圖文處理 >> Photoshop教程 >> ps入門教程 >> 什麼是PS智能對象?PhotoShop智能對象功能理解基礎教程
什麼是PS智能對象?PhotoShop智能對象功能理解基礎教程
針對Photoshop智能對象的有用的小技巧,不知道的同學可要好好學習一下咯~

圖一
In my opinion, Smart Object is one of the most useful feature in Photoshop. It allow us to save a lot of time in designing website and graphic user interfaces, where there are plenty of repetitive elements. If you have a good understanding on how a Smart Object behaves, it can also serve as a template for Photoshop effects.
在我看來,智能對象是Photoshop新增功能裡最有用的項目之一。它可以讓我們在網頁設計和圖像處理中節省很多的時間,比如需要有大量重復的效果時。如果你對智能對象的工作原理有一個很好的認識,它甚至可以作為模板批量應用一些圖片特效。
What is a Smart Object?
Smart Objects are layers that contain image data from raster or vector images, such as Photoshop or Illustrator files. Smart Objects preserve an image’s source content with all its original characteristics, enabling you to perform nondestructive editing to the layer (quoted from Adobe ).
什麼是智能對象?智能對象是包含柵格或矢量圖像(如 Photoshop 或 Illustrator 文件)中的圖像數據的圖層。智能對象將保留圖像的源內容及其所有原始特性,從而讓您能夠對圖層執行非破壞性編輯。(摘自adobe的自述文檔)
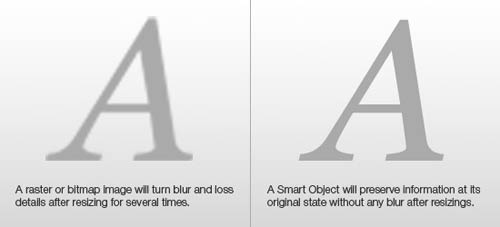
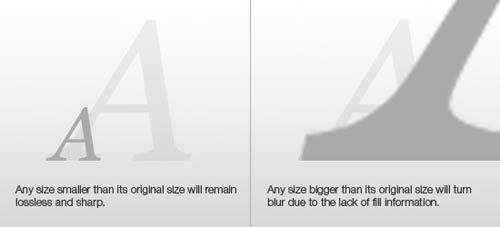
The image below demonstrates a nondestructive transformation done to a raster graphic. In normal conditions, a raster or bitmap image will turn blur after resizing for few times with the transformation tool (seen on left). By converting the raster image to a Smart Object, any transformations that come after will remain sharp like the original. All the pixels information are preserved upon the conversion (seen on right).
下面這幅圖像表現的是無損處理和普通處理的區別。
在普通模式下(圖二),柵格化的圖像或者位圖在做變形處理的時候會變得模糊(這個結果隨著變形次數的增多會更加明顯)。
如果將圖層事先轉變成智能對象的話,無論進行任何變形處理,圖像始終和原始效果一樣,沒有一點模糊(右圖)。所有像素信息在變形的時候都會被保護起來。
圖二
By preserving the original pixels, any scale smaller than the original size will remain great but it will still be blur when made bigger due to the lack of fill information. So it is better to convert a high resolution raster image right from the start.
通過保護原始像素,任何縮小的處理都會表現的非常好,但是放大處理仍然會變的模糊,畢竟需要通過計算添加一些原本沒有的信息。(當然智能對象的表現會遠高於普通圖層的處理),所以我們最好在一開始就選擇像素很高的源文件來處理,避免放大操作。
圖三
How to Create a Smart Object?
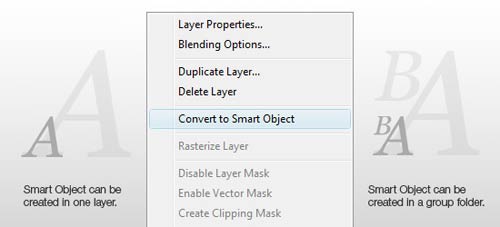
There are several methods to create a Smart Object: by using the File > Open As Smart Object command; copying and pasting data from Illustrator; or converting one or more Photoshop layers to Smart Objects (shown below).
如何建立智能對象?
有以下幾個方法來實現:
1:文件-打開為智能對象(通過這種方法使得文件在進入 Photoshop的時候就是一個智能圖層);
2:從Illstrator中復制文件內容過來;
3:在Photoshop中選擇一個或多個圖層,在快捷菜單中選擇將其轉換為智能對象(如圖四)。
圖四
Ways to Use a Smart Object
Of course there are many creative ways to use Smart Objects. The few that I am sharing below are only the more common methods.
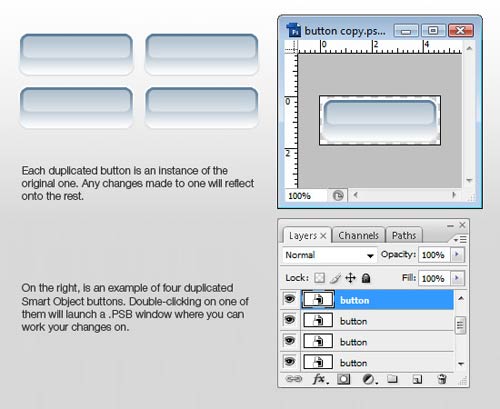
Once you converted a layer or group of layers into a Smart Object, any duplicates of it will act as instances. This means that any changes made to one Smart Object layer will reflect to all the other duplicates. The example below is demonstrating a button with another 3 instances. This setup is useful for design drafts with constant changes to the look and feel. By planting a button template across your document, it will save time by just amending one button and the rest will follow.
The important point to look out here is that, double-clicking on a Smart Object layer will launch a new .PSB window with your template elements in it. After performing the amendments, make sure you SAVE the .PSB document in order for the original .PSD to register the changes. Since there is a separate .PSB document for every Smart Object, you can also save it as a single file that is reusable for your next design!
智能對象的用途
當然,智能對象有各種各樣創意的用法。下面我列舉的只是最平常的一些。
一旦你把一個或者一組圖層轉換為智能對象,將其復制幾份,然後對其中任意一份進行處理,其他幾個都會發生相同的變化。下圖就是該方法的一個例子。我們經常需要調整某一系列零件(比如網頁按鈕)的外觀,使其中整副圖像中的效果更好,所以這種方法在做設計稿時十分有用。我們只需要改變其中一個智能對象,就可以控制所有副本在全局中的變化。
這裡需要注意的一個重點是,雙擊一個智能對象圖層的時候會打開一個.psb的新文檔窗口,智能對象圖層包含的內容都在裡面。當處理完得到想要的效果後。請記得一定要保存這個.psb文件 (ctrl+s)如圖五,這樣在.psd文檔裡相應的對象及副本才會產生改變。當然每個智能對象.psb文件還可以單獨存儲起來,以便於在以後的設計中重復使用。
圖五
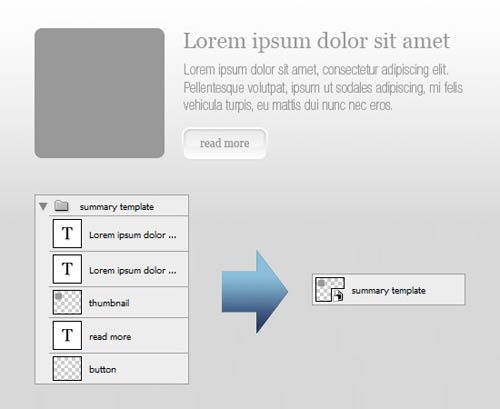
Following is an example showing what we normally do to a post summary. There will be a thumbnail, post title, post summary and read more button. What we usually do is to group them all up in a single folder and duplicate them several times. This not only makes Photoshop performs slower due to the many layers and it is also troublesome if we just need to do one simple amendment, such as changing the font for post title.
So what we can do to improve our effiency is to convert the entire group folder into one Smart Object!
下面是在制作網頁時摘要部分用智能對象處理的一個例子。通常包括一個縮略圖、標題、摘要以及read more的按鈕。我們以前都是把它們編到一組,然後復制幾遍。這樣做不僅讓Photoshop在面對大量圖層時變的運行緩慢,更麻煩的是當我們要對其中一項進行更改,比如標題的字體樣式,我們不得不對每一個副本進行更改。
所以我們最好的方法是將整個摘要部分的組轉化為一個智能對象(如圖六)。
圖六
We can then do more complicated designs, in this case we made three post summaries using only three Smart Object layers. This shall make your Layers Panel look much neater.
這僅僅是一個簡單的摘要部分,如果是更為復雜的內容,使用智能對象將顯得極為方便。這裡我們只使用了3個智能對象(其中兩個是副本)。圖層面板顯得非常清爽(圖七)。
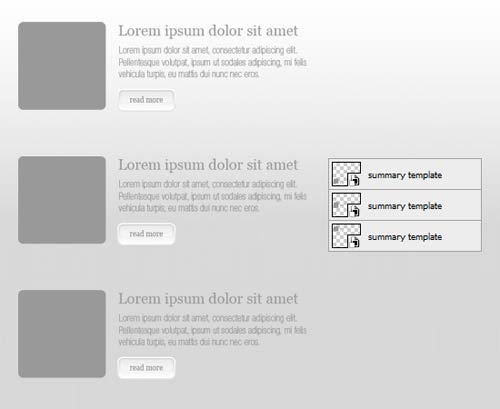
圖七
Smart Object as a Template for Photo Effects
This can work similar to those presets found in Photoshop Elements if done properly. I shall demostrate a simple example of what I mean by that. Let us start off with a photograph (in courtesy of ShutterStock ).
智能對象作為圖片處理的模板使用。
使用恰當的話,這可以應用於大部分的Photoshop 處理工作。通過下面這個例子大家應該可以對這種方式有更好的理解。
我們從這張圖片開始 (in courtesy of ShutterStock)(圖八)。